View 是用來顯示使用者介面。 所有的 View 都存在 Views 目錄下的子目錄中。 每一個 Controller 名稱,在 Views 中都應該對應到一個相同名稱的子目錄, 然後再依據該控制器的 action method 名稱加入適當的 View 。


在一般情況下,action method 執行完畢後所回傳的 View ,其名稱會和 action method 的名稱相同。 但是,你也可以回傳一個特定名稱的 Veiw ,例如:return View("SomeView").
public ActionResult Edit(string id)
    {
        Customers customers = db.Customers.Single(c => c.CustomerID == id);
        return View(customers);                 //return Edit View
    }

    public ActionResult Edit(string id)
    {
        Customers customers = db.Customers.Single(c => c.CustomerID == id);
        return View("VIPEdit", customers);      //return VIPEdit View
    }
Creating View
View 是用來展示資料用的,所有輸入的邏輯運算應該在 controller 中就已經完成,所以 View 不須要有 code-behind 類別。 若要取得 controller 傳進來的資料,只要在標籤中透過 inline code 就可以。
View 檢視引擎
View 的 inline code ,在 MVC3 中,支援二種寫法,所以在建立檢視時,你必須先決定使用哪一種檢視引擎。

ASPX 檢視引擎(ASPX View Engine)
使用 ASPX 檢視引擎建立的 View ,副檔名為 .aspx ,其程式碼部份必須使用 <% ... %> 包起來。

Razor 檢視引擎(Razor View Engine)
使用 Razor 檢視引擎建立的 View ,副檔名為 .cshtml ,其程式碼部份開頭為「@」。

建立 View
MVC 的 View 包含下列幾種不同類型:
- ViewPage :(.aspx) MVC 頁面的基底類別
- ViewMasterPage :(.Master) MVC 主版頁面的基底類別
- ViewUserControl :(.ascx) MVC 使用者控制項的基底類別

不過,以上項目都是使用 ASPX 檢視引擎模式才有的項目,若是使用 Razor 檢視引擎,在 Visual Studio 中所對應的項目分別為:
- 檢視頁面 (.cshtml)
- 版面配置頁 (.cshtml)
- 部分頁面 (.cshtml)

當加入一個含有模型類別的控制器時,系統會自動幫我們建立標準的 View Page。 這些 View Page 的副檔名為 .aspx ,繼承自 System.Web.Mvc.ViewPage 類別 (基底也是 ASP.NET Page 類別) 。 你也可以在 ASP.NET MVC 的 View 中加入 Master Page 或 User Control 。在 ASP.NET MVC 中的 User Control 通常稱之為 Partial View 。
Using the HTML Helper Classes
View 裡面有個輔助物件叫做 HtmlHelper ,它提供許多擴充方法可以用來支援 render 頁面控制項的內容,來簡化程式碼的撰寫。 例如,建立下拉選單的清單項目、加密、格式化字串等等。
An HtmlHelper instance is exposed through the ViewPage.Html property.
<p> <label >@ViewData["Msg"].ToString()</label> </p>

<!-- using HtmlHelper -->

<p> @Html.Label(ViewData["Msg"].ToString()) </p>
更多 HtmlHelper 的用法,請參考 這篇介紹
Creating Strongly Typed Views
Using Strongly Typed View
由前面我們知道,要由 Model 傳資料到 View ,可以將資料存放在 ViewData 中。 強型別的 View 指的是直接由 Model 傳進來一個特定物件,而不是存放在 ViewData 中。 要建立強型別的View ,你可以在 View 上頭加上型別宣告,或者在建立 View 時,直接設定為強型別檢視。
建立強型別的 View
在 razor 模式中,使用 @model 宣示詞來定義這個 View Page 的型別
//aspx
<%@ Page Language="C#" Inherits="System.Web.Mvc.ViewPage<MvcApplication1.Models.Customers>" %>

//razor
@model MvcApplication1.Models.Customers
由 Controller 中傳送強型別參數給 View
public ActionResult Details(string id = null)
    {
        Customers customers = db.Customers.Single(c => c.CustomerID == id);
        if (customers == null)
        {
            return HttpNotFound();
        }
        return View(customers);
    }
在 View 中使用強型別物件
@model MVC4_EX1.Models.Customers
<div class="display-label">
        @Html.DisplayNameFor(model => model.CompanyName)
</div>
<div class="display-field">
    @Html.DisplayFor(model => model.CompanyName)
</div>
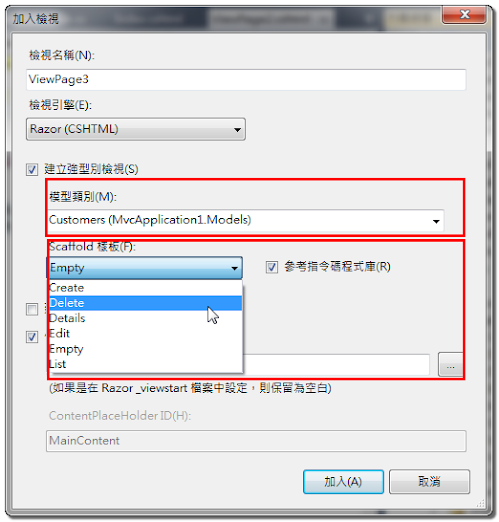
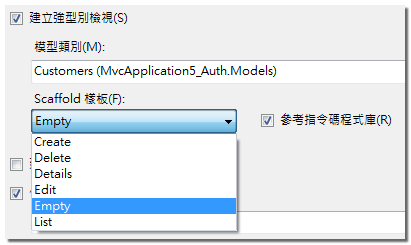
Using Scaffold Template (鷹架)
在新增 View 的設定視窗中,有個「scaffold 樣板」欄位,它是用來設定 View Page 預設的呈現型態,如 Create, Delete, Details, Edit, List, or Empty 等樣式. 所以, 若要建立一個編輯用的 View ,就可以選用 Edit 樣式; 若要顯示清單資料時,可以選用 List 樣式。
當選擇 List 樣式時, View Page 的型別會被設定為 IEnumerable<> 泛型列舉型別,所以它可以接收來自 Model 的列舉物件清單。 只要套用 foreach 指令,搭配 HtmlHelper 方法,就可以輸出每一筆清單資料。
@model IEnumerable<MvcApplication1.Models.Customers>

<table>
@foreach (var item in Model)
{
    <tr>
        <td>@Html.DisplayFor(modelItem => item.CompanyName)</td>
        <td>@Html.DisplayFor(modelItem => item.ContactName)</td>
        <td>@Html.DisplayFor(modelItem => item.ContactTitle)</td>
        <td>@Html.DisplayFor(modelItem => item.Address)</td>
        <td>@Html.DisplayFor(modelItem => item.City)</td>
        <td>
            @Html.ActionLink("Edit", "Edit", new { id = item.CustomerID }) |
            @Html.ActionLink("Details", "Details", new { id = item.CustomerID }) |
            @Html.ActionLink("Delete", "Delete", new { id = item.CustomerID })
        </td>
    </tr>
}
</table>
Uing Model Validation in Views(資料驗證)
Model Validation 指的是使用 metadata 來設定欄位資訊和驗證功能。 要套用這個功能,你只要在 Model 層中建立該物件類別的 metadata ,並直接加上驗證屬性, 它就會配合用戶端的 Client-side library 做協同處理,達到 client-validation 的功能。
這些 MetadataType 屬性都包含在 DataAnnotations 命名空間之中。 要使用 Model Validation ,你必須調整以下內容:
1. Create Metadta Class
- 先建一個 metadata 類別 (using DataAnnotations )
- 再建立一個該資料模型的 partial 類別,並透過 MetadataType 屬性指定其 metadata 類別
public class CustomersMetadata
    {
        [StringLength(40)]
        [Required(ErrorMessage = "Customer id is required.")]
        [Display(Name="客戶ID")]
        public object CustomerID { get; set; }

        [Required(ErrorMessage = "ContactName is required.")]
        [Display(Name = "連絡人")]
        public object ContactName { get; set; }

        [Required(ErrorMessage = "Phone is required.")]
        [Display(Name = "連絡電話")]
        public object Phone { get; set; }
    }

    [MetadataType(typeof(CustomersMetadata))]
    public partial class Customers
    {
    }
2. Controller
當 metadata 類別建立之後,controller 會依據 metadata 中的設定去處理商務規則。 接著使用 ModelState.IsValid 方法檢查是否所有的驗證規則都有過關, 如果驗證沒過關,錯誤訊息將被 render 在 ResultView 中, 如果驗證過關,則使用者將被帶到索引頁。
[MyActionFilter]
public ViewResult Index()
{
    return View("ResultView", customer);
}

public ViewResult Index(Customers customer)
{
    [HttpPost]
    public ActionResult Index(Customers customer)
    {
        if (ModelState.IsValid)     //模型的驗證狀態
            return RedirectToAction("Index");       //if pass, redirect to index action
        else
            return View("ResultView", customer);    //if fail, return Index View
    }
}
3. View
在 View 裡,你可以設定驗證後的提示訊息。 例如,底下是一個 Edit 型態的強型別 view , 在這個 View 中,使用 helper 類別中的 ValidationMessageFor 和 ValidationSummary 來產生驗證項目。
@model MvcApplication1.Models.Customers
@{
    ViewBag.Title = "ViewPage2";
}
<script src="@Url.Content("~/Scripts/jquery.validate.min.js")" type="text/javascript"></script>
<script src="@Url.Content("~/Scripts/jquery.validate.unobtrusive.min.js")" type="text/javascript"></script>

@using (Html.BeginForm())
{
    <table>
        <tr>
            <td>
                @Html.LabelFor(model => model.CustomerID)
            </td>
            <td>
                @Html.EditorFor(model => model.CustomerID)
                @Html.ValidationMessageFor(model => model.CustomerID)
            </td>
        </tr>
        <tr>
            <td>
                @Html.LabelFor(model => model.ContactName)
            </td>
            <td>
                @Html.EditorFor(model => model.ContactName)
                @Html.ValidationMessageFor(model => model.ContactName)
            </td>
        </tr>
        <tr>
            <td colspan="2">
                <input type="submit" value="submit" />
            </td>
        </tr>
    </table>
    @Html.ValidationSummary(true)
}
@model MvcApplication1.Models.Customers
@{
    ViewBag.Title = "ViewPage3";
}

<h1>You Type ...</h1>

CustomID: @Html.Label(Model.CustomerID) <br />
ContactName: @Html.Label(Model.ContactName) <br />

Scaffold 樣版
在建立 View 時,有個選項是 Scaffold 樣版,若有選用,則系統會更據 Model 的 Metadata 自動產生 View Page 的基本樣式。它共有6種樣版:Create、Detele、Details、Edit、Empty、List。
所以 ModelMetadata 不僅可以用來設定資料的驗證,也可以用來設定頁面內容的呈現。底下幾個類別屬性是 Scaffold 在建立樣版時較常會使用到的設定。
- DisplayAttribute :設定標題要顯示的文字。
- KeyAttribute :在 View 中,會使用 Html.HiddenFor() 來產生頁面資訊。
- ScaffoldColumnAttribute :指定該欄位是否使用 Scaffolding 。
MVC 的 Master Page
Razor 與 Aspx 的 MasterPage 比較
| Razor | ASPX | |
|---|---|---|
| 架構 | 主要由 body 和 section 二種區塊構成, body 是必要的區塊,且只有一個; section 區塊可以設定零個或多個。 | 由一個或多個 ContentPlaceHolder 構成所有區塊。 |
| MasterPage 範例 | <!DOCTYPE html>
<html>
<head>
<meta name="viewport" content="width=device-width" />
<title>@ViewBag.Title</title>
@RenderSection("header", false)
</head>
<body>
<div>
@RenderBody()
</div>
@RenderSection("footer", required:false)
</body>
</html>
| <%@ Master Language="C#" Inherits="System.Web.Mvc.ViewMasterPage" %>
<!DOCTYPE html>
<html>
<head id="Head1" runat="server">
<meta name="viewport" content="width=device-width" />
<title><asp:ContentPlaceHolder ID="TitleContent" runat="server" /></title>
</head>
<body>
<div>
<asp:ContentPlaceHolder ID="MainContent" runat="server">
</asp:ContentPlaceHolder>
</div>
</body>
</html>
|
| 內容頁 | @{
ViewBag.Title = "Post";
Layout = "~/Views/Shared/_Blog.cshtml";
}
@section header{
@*設定相關的 meta 資訊*@
<meta />
}
<h2>Post</h2>
<p>Content</p>
@section footer{
@*加入本頁特定的 js*@
<script type="text/javascript"></script>
}
| <%@ Page Title="" Language="C#" MasterPageFile="~/Views/Shared/ViewMasterPage1.Master"
Inherits="System.Web.Mvc.ViewPage<dynamic>" %>
<asp:Content ID="Content1" ContentPlaceHolderID="TitleContent" runat="server">
View1
</asp:Content>
<asp:Content ID="Content1" ContentPlaceHolderID="MainContent" runat="server">
<h2>View1</h2>
</asp:Content>
|
Razor 補充說明:
- 內容頁中,只要不是在 section 中的內容,最後都會由主版頁面的 @RenderBody() 輸出。
- 若主版頁中的 RenderSection 參數包含 required:false ,表示內容頁可以不需要這個區塊。
Creating Partial (Child) Views
部份檢視 (partial view),類似 web form 中的使用者控制項(user control)。 也就是可以將部份內容,獨立製作,以達共享的目的。 若使用 aspx View ,它一樣被稱為「使用者控制項」,若使用 razor View ,它則被稱為「部份頁面」。

Creating Partial Views
建立 partial view ,有二個方法: (1)直接新增一個 partial view 項目;(2)新增一個 view , 將其屬性設成部份檢視。
新增一個 partial view 項目

部份頁面和檢視頁面其實是相同的,只是部份頁面含有預設的html tag,而檢視頁面則是完全空白的檔案。
新增一個部份檢視的 View

Using Partial Views
要載入 PartialView 有二種模式:
- Render Partial :透過 ViewName 或 ViewPath 直接載入另一個 ViewPage 或 PartialPage 。例如將版權宣告設計在一個 PartialPage,就可以方便內嵌到各個頁面。
- Render Action :透過 controller 的 action 方法,以取得 PartialView 的內容。例如在一個顯示部門資料的頁面中,同時顯示包含該部門的員工資料。
與這二個模式相關的 HtmlHelper 方法如下:
- Html.RenderAction :叫用指定的子系動作方法,將結果以內嵌(inside)形式,嵌在 parent view 之中。
- Html.RenderPartial :將指定的部分檢視,轉譯成 HTML,並直接內嵌在 parent view 之中。
另外,如果想將取得的結果以字串型式回傳,可以使用以下方法:
- Html.Action :叫用指定的子系動作方法,將結果以HTML字串形式傳回結果。
- Html.Partial :將指定的部分檢視,回傳轉譯後的 html 字串。
// Action

public static MvcHtmlString Action(this HtmlHelper htmlHelper, string actionName);
public static MvcHtmlString Action(this HtmlHelper htmlHelper, string actionName, object routeValues);
public static MvcHtmlString Action(this HtmlHelper htmlHelper, string actionName, string controllerName);
public static MvcHtmlString Action(this HtmlHelper htmlHelper, string actionName, string controllerName, object routeValues);

public static void RenderAction(this HtmlHelper htmlHelper, string actionName);
public static void RenderAction(this HtmlHelper htmlHelper, string actionName, object routeValues);
public static void RenderAction(this HtmlHelper htmlHelper, string actionName, string controllerName);
public static void RenderAction(this HtmlHelper htmlHelper, string actionName, string controllerName, object routeValues);

// Partial

public static MvcHtmlString Partial(this HtmlHelper htmlHelper, string partialViewName);

public static void RenderPartial(this HtmlHelper htmlHelper, string partialViewName);
@model MvcApplication1.Models.Customers

CustomID: @Html.Label(Model.CustomerID) <br />
ContactName: @Html.Label(Model.ContactName) <br />

@Html.Action("CustomerOrders", new { CustomerID = Model.CustomerID })
@model IEnumerable<MvcApplication1.Models.Orders>
@{Layout = null;}

<table>
@foreach (var item in Model)
{
    <tr>
        <td>@Html.DisplayFor(modelItem => item.CustomerID)</td>
        <td>@Html.DisplayFor(modelItem => item.OrderDate)</td>
        <td>@Html.DisplayFor(modelItem => item.ShipAddress)</td>
        <td>@Html.DisplayFor(modelItem => item.ShipCity)</td>
    </tr>
}
</table>
上面這個範例,當收到 ../Customers/Index 需求時, 首先 CustomersController.Index 會先被執行,並回傳 IndexView。 然後,由 IndexView 中,再 call out 去執行 CustomersController.CustomerOrders,並回傳 CustomerOrdersView。 而且,CustomerOrdersView 的內容會內嵌在 IndexView 之中。
如果在 partial view 中想要存取 parent view 中的資料,parent view 可以將資料先存於 ViewData 物件中。 但是, partial view 存取到的資料,只是該資料的複本,任何修改都會局限在複本中而已。
examples
CopyRightControl is a UserControl in Shared Folder
ShowTime is an action method in HomeController.
下列方法都可以用來轉譯使用者控制項.
@Html.Partial("CopyRightControl")
@{ Html.RenderPartial("CopyRightControl"); }
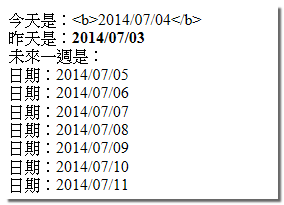
@Html.Action("ShowTime", "Home")
@{ Html.RenderAction("ShowTime", "Home"); }
Passing data to View
利用 ViewData 、 ViewBag 物件
- ViewData :Gets or sets the dictionary for view data.
- ViewBag :Gets or sets the dynamic view data dictionary.
- TempData :Gets or sets the dictionary for temporary data。
- ValidateRequest :Gets or sets a value that indicates whether request validation is enabled for this request.
ViewData 和 ViewBag 的資料經過 RedirectToAction 後就會消失,所以若遇到這種情況且要暫時保存資料,就必須使用 TempData 。
ViewData 是 Dictionary 型別,而 ViewBag 是 dynamic 型別,直接使用 ViewBag 可以避免轉型。
public ActionResult CacheTest1()
    {
        ViewBag.Now = System.DateTime.Now;
        ViewBag.Message = "Wellcom to MVC";

        ViewData["Now"] = System.DateTime.Now;
        ViewData["Message"] = "Wellcom to MVC";

        return View();
    }
<div>
        <h2>Using ViewBag</h2>

            Now : @ViewBag.Now  <br />
            Message : @ViewBag.Message  <br />

        <h2>Using ViewData</h2>

            Now : @ViewData["Now"]  <br />
            Message : @ViewData["Message"]  <br />
    </div>
傳送強型別物件
使用強型別撰寫程式,可以減少執行階段錯誤發生的機會。
建立 Model
首先先建立一個模組類別
public class CacheModel
    {
        public string Message { get; set; }
        public DateTime Now { get; set; }
    }
在 Controller 中設定 Model 中的欄位
接著在 Controller 中,新增一個模組類別的實體,並依需求設定類別的欄位值,同時將它當成參數傳遞給 View 。
public ActionResult CacheTest2()
    {
        CacheModel model = new CacheModel();
        model.Now = System.DateTime.Now;
        model.Message = "Wellcom to MVC";
        return View(model);
    }
在 View 中讀取 Model 中的欄位
若在 razor 模式中,必須使用 @model 宣示詞來定義這個 View Page 的型別
@model MvcApplication1.Models.CacheModel

<!DOCTYPE html>

<html>
<head>
    <title>CacheTest2</title>
</head>
<body>
    <div>
        <h2>Using StrongType</h2>

            Now : @Model.Now  <br />
            Message : @Model.Message  <br />
    </div>
</body>
</html

沒有留言:
張貼留言